Installation and Configuration Manual — eCharge Hardy Barth cPµ2 Pro
1. Introduction
1.1. Legal provisions
The information contained in these documents is the property of Heckert Solar GmbH. Publication, in whole or in part, requires the written consent of Heckert Solar GmbH.
Subject to changes and printing errors!
1.2. Qualification of the installing electrician
A qualified electrician is a person who has the necessary experience and training:
-
Setting up, switching on, switching off, disconnecting, short-circuiting and repairing circuits and devices
-
Standard maintenance and use of protective devices in accordance with current safety standards
-
First aid/emergency care
-
Current knowledge of local regulations, standards and guidelines
1.3. Symbols used
Before reading the manual, you should familiarize yourself with the different types of safety warnings. You should also familiarize yourself with the importance of the safety warnings.
1.4. Symbol conventions
|
||
|
||
|
||
|
2. Product description
2.1. Prerequisites
The following is required to use the charging station:
-
Symphon-E App eCharge Hardy Barth cPµ2 Pro Charging Station
|
The "Symphon-E App eCharge Hardy Barth cPµ2 Pro Charging Station" is not included in the scope of delivery. This must be purchased separately if not already available. |
3. Commissioning
To install the Hardy-Barth charging station, please follow the instructions in the "Installation and operating instructions cPμ2 charging station". |
The "Configuration Manual" for the Salia board should also be read and internalized: |
|
This quick guide refers to the original user manuals. |
| The plug connection for the LED display can be disconnected if required. This makes it easier to work on the charging station during commissioning. |
| We recommend checking the plug connection to the left of the Ethernet port on the Salia board, as in our experience this is often loose. |
Once the charging station has been installed and configured, it must be connected to the customer network via the network interface (LAN) on the Salia board.
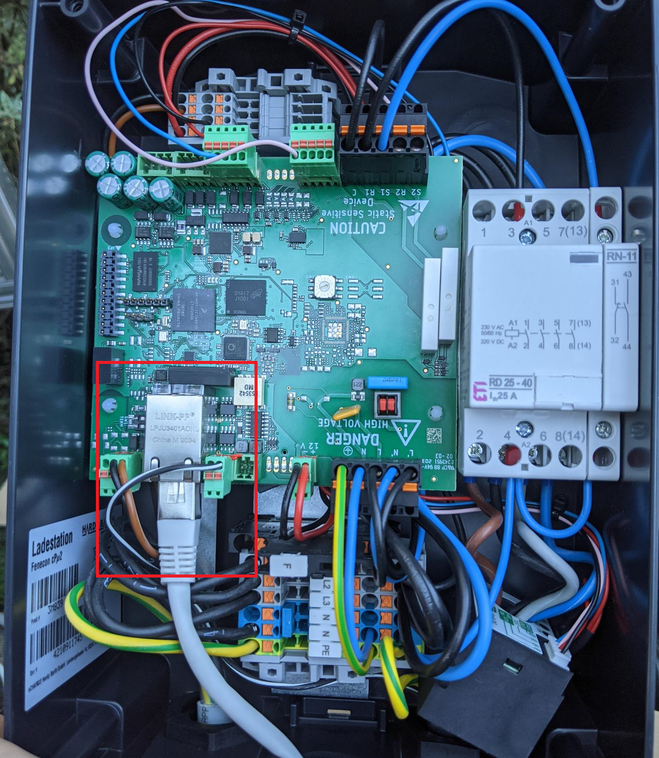
3.1. Connecting the meter
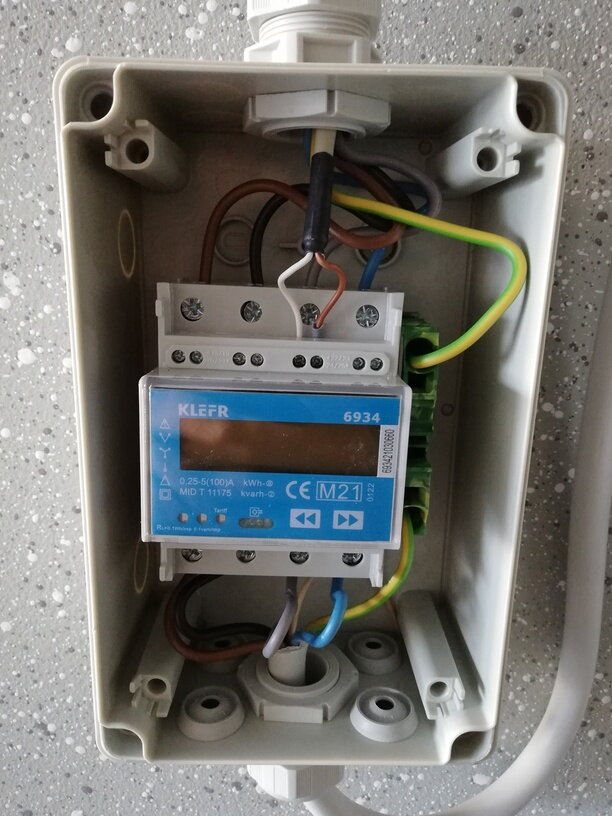
Connect the meter as shown below:
Use the enclosed instructions for this:
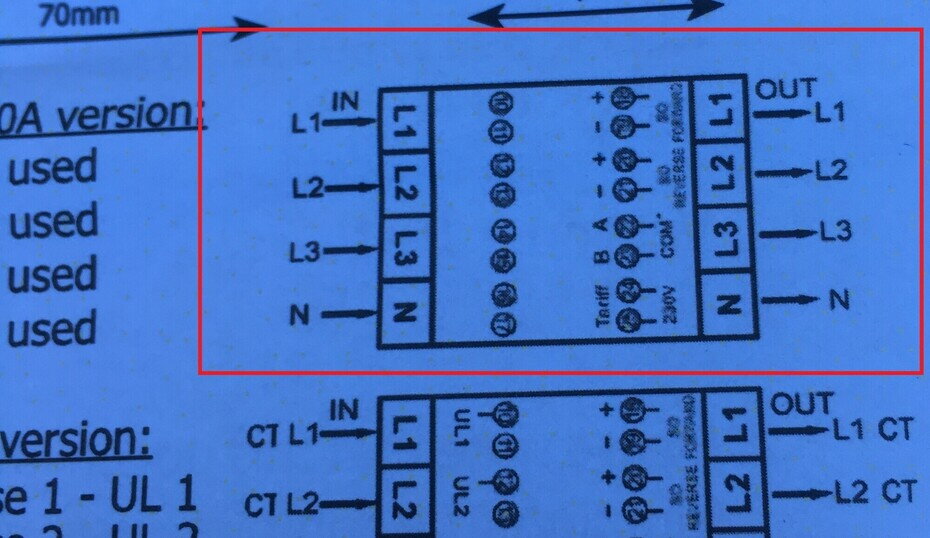
| Make sure that the meter is installed the right way round: OUT must point towards the charging station, IN towards the sub-distribution board. |
Establish the communication connection to the meter as follows:
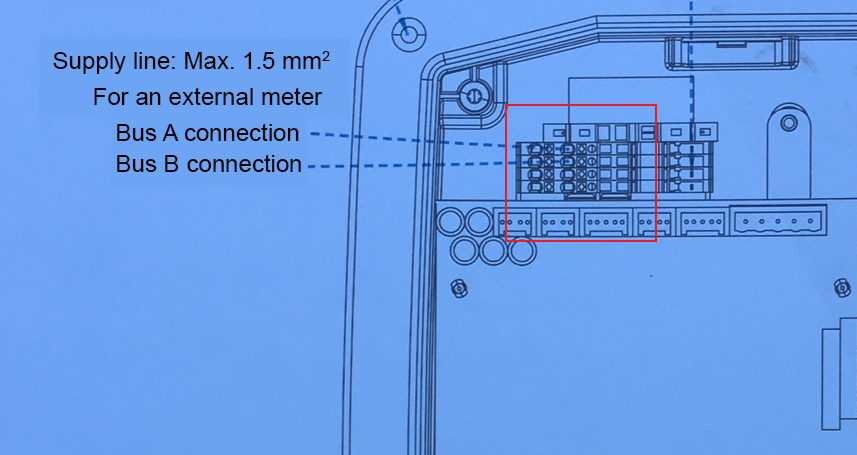
The negative contact of the cable must be connected to contact A on the meter and to contact 22 (top) on the Salia board. The positive contact of the cable must be connected to contact B on the meter and to contact 23 (bottom) on the Salia board.
3.2. Configuration
By default, the charging station can be reached under the IP address 192.168.25.30 (or 169.254.12.30).
To reach the charging station from your notebook/PC, it is necessary to set up a static IP address in the same subnet (e. g. 192.168.25.1) in the network adapter settings.
-
To do this, connect the Salia board to your device (here: notebook) via the RJ45 socket, as shown below:

-
Open your web browser to access the web interface. To do this, enter the following IP address:
192.168.25.30
If problems occur in step 2, proceed as follows:
-
Open the "Network and Sharing Center" under the system settings of your PC.
-
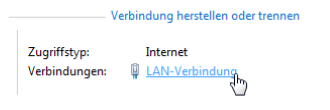
Click on LAN connection.
-
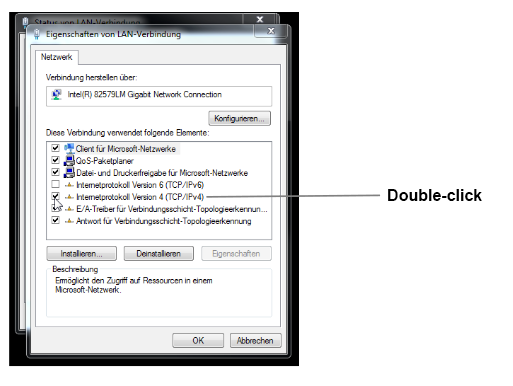
In the newly opened window, click on Properties
-
In the new window, double-click to open the "Internet Protocol Version 4 (TCP/IPv4)" item
(see graphic).
Alternatively, select "Internet Protocol Version 4 (TCP/IPv4)" in the open window and then click on "Properties"
-
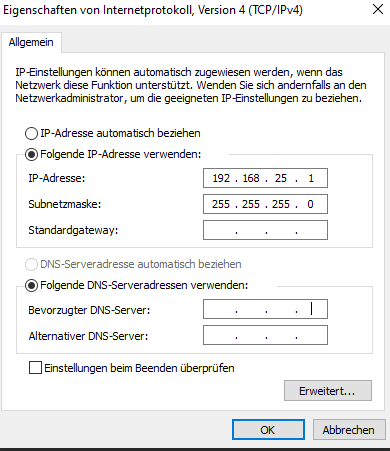
In the next window, select "Use the following IP address" to enter the IP address
192.168.25.1and the subnet mask255.255.255.0as shown in the picture below. The entries for the DNS server can be left blank.
-
Confirm the entries. Then switch off the power to the wallbox once, wait a few seconds and allow the wallbox to reboot.
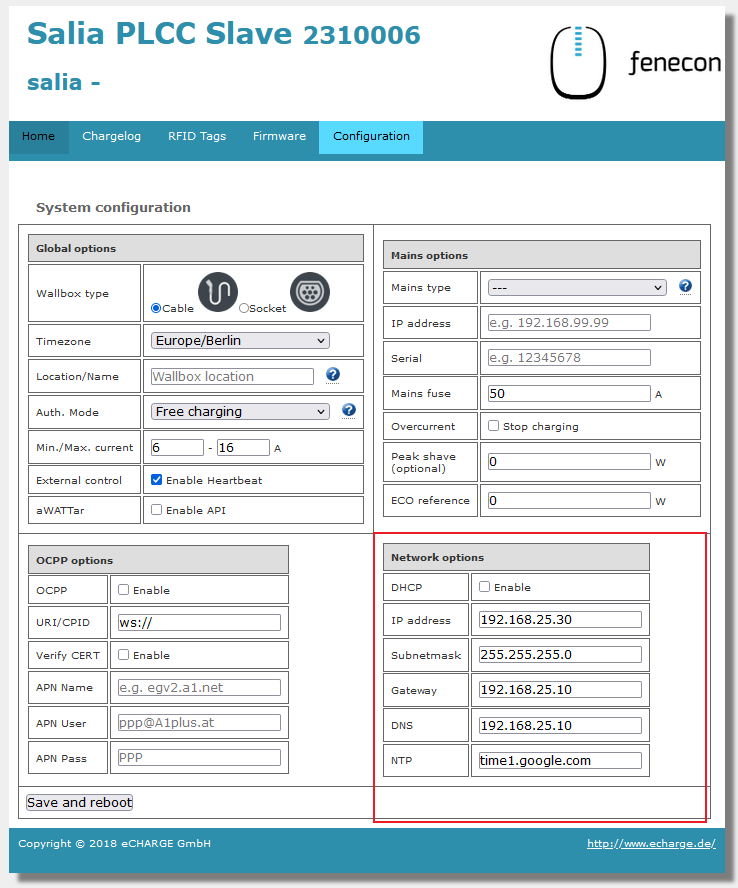
The charging station can then be configured via the web interface. To do this, enter the IP address of the charging station (192.168.25.30) in the address bar of the browser. The web interface then appears as shown below:
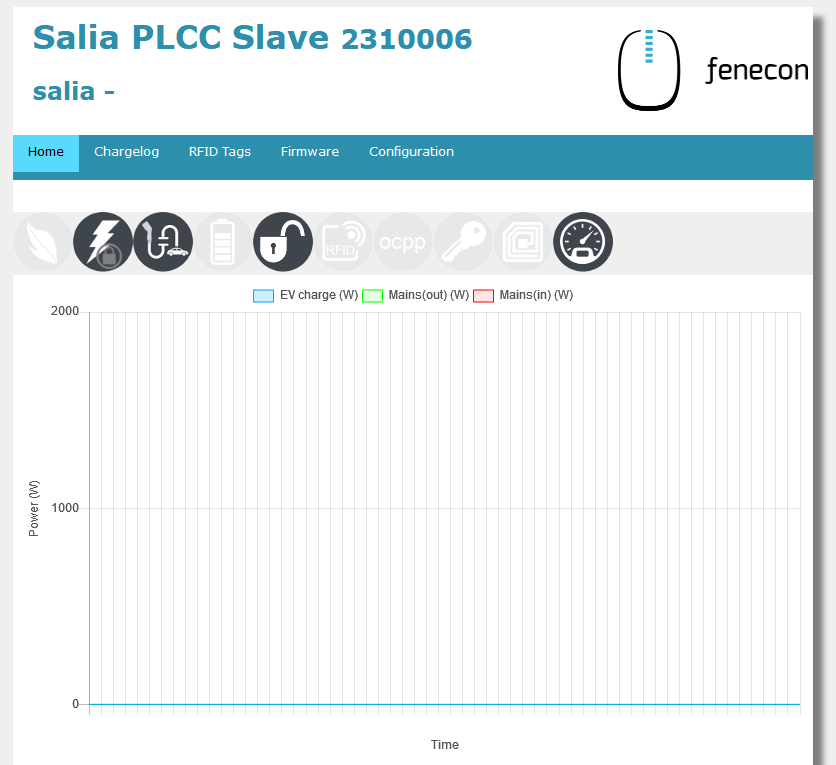
The network settings can be checked here:
3.3. Configuration of the meter
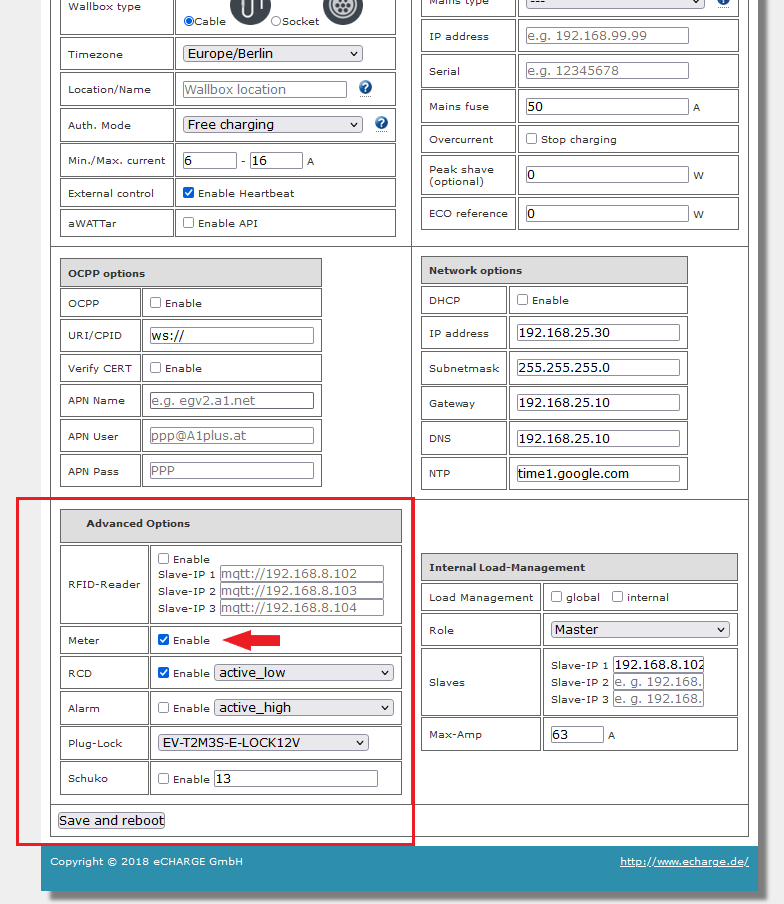
It must be ensured that the meter is activated:

If this is not the case (grayed out symbol), it must be activated manually. To do this, double-click in the free area next to System configuration:
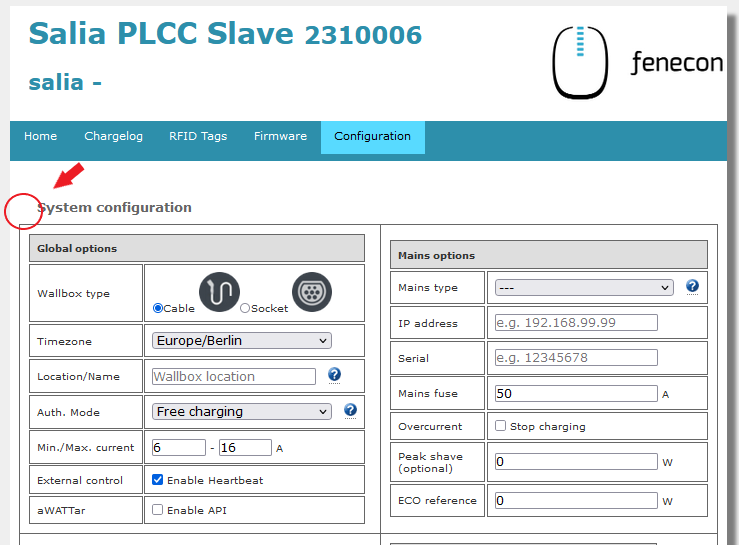
An extended view with further configuration options then opens. The meter can be activated under Advanced Options:
| If no meter values are displayed in the EMS Online Monitoring, please check whether the correct meter has been selected. |
Double-click on the cogwheel next to Advanced Options to do so:
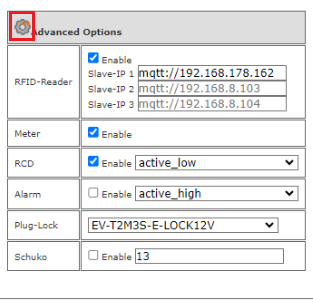
An extended view then opens with further configuration options for meters and RFID cards.
Please check that the correct meter has been selected under Advanced Meter Options under Protocol.
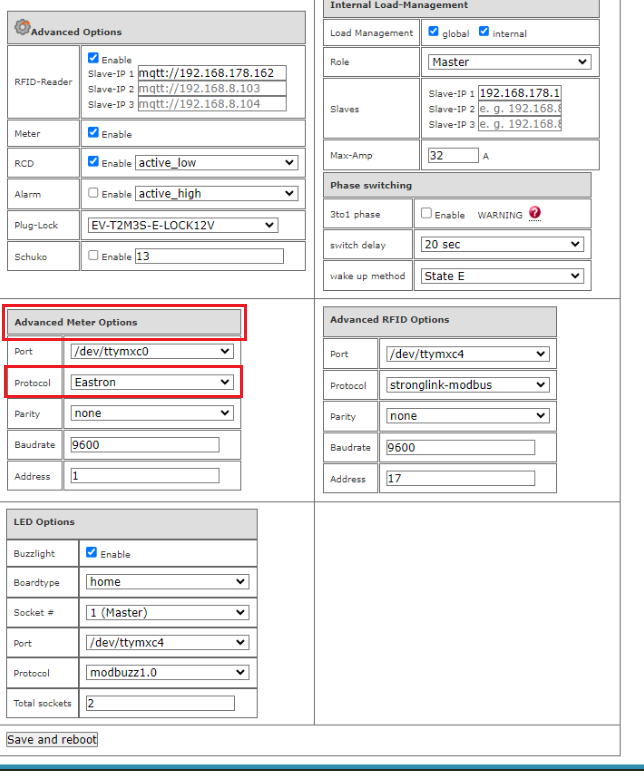
In this example, an "Eastron" meter is selected.
3.4. Saving the changes
To apply your changes, click on Save and reboot

We recommend that you always use the latest firmware to ensure that all the latest functions of the charging station can be used.
3.5. RFID authorization
We are currently working on compatibility with Hardy Barth RFID authorization.
|
Please note the following software requirements for RFID authorization of your Hardy Barth eCharger cPµ2 Pro. |
Compatibility with Heckert Solar energy management system |
|
Hardy Barth eCharger |
Requires software version 2.2.0 or newer. |
To activate RFID authorization on a test basis, please follow the steps below.
-
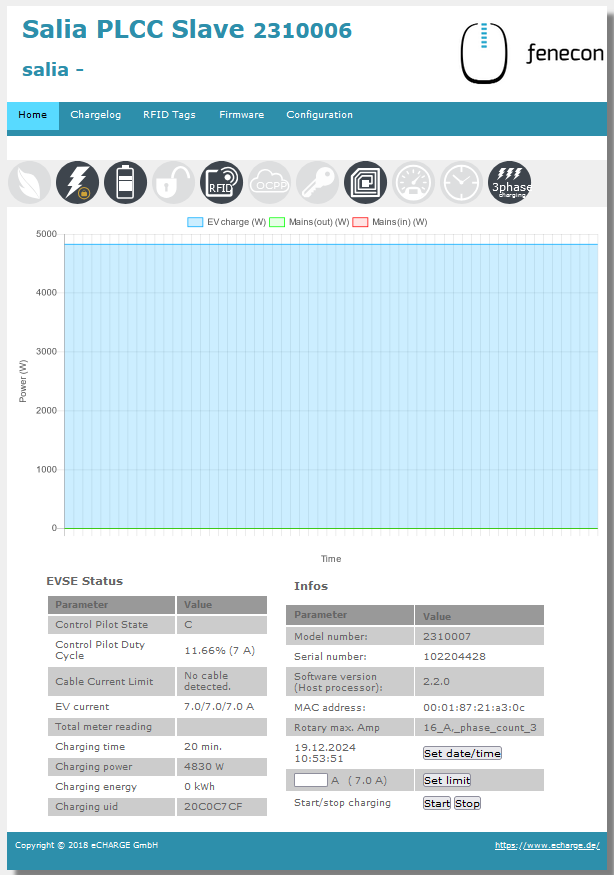
To do this, open the SALIA web interface.
-
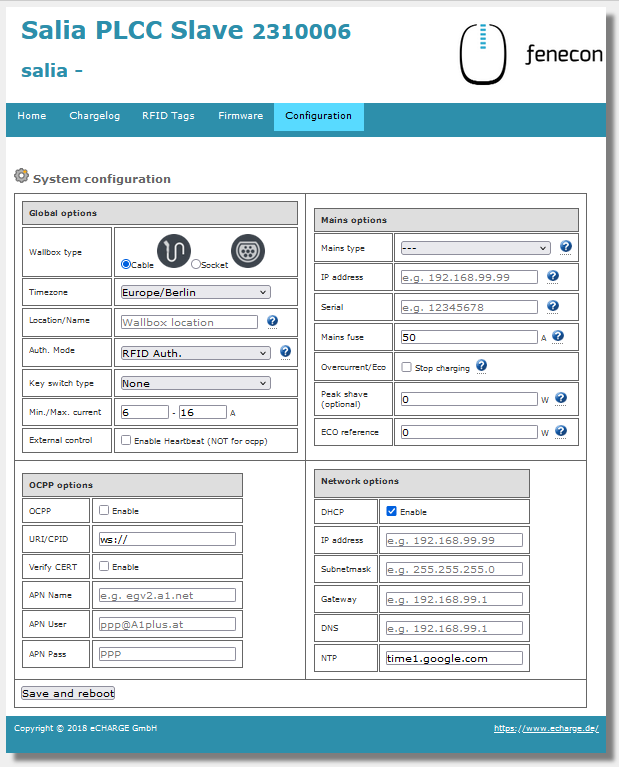
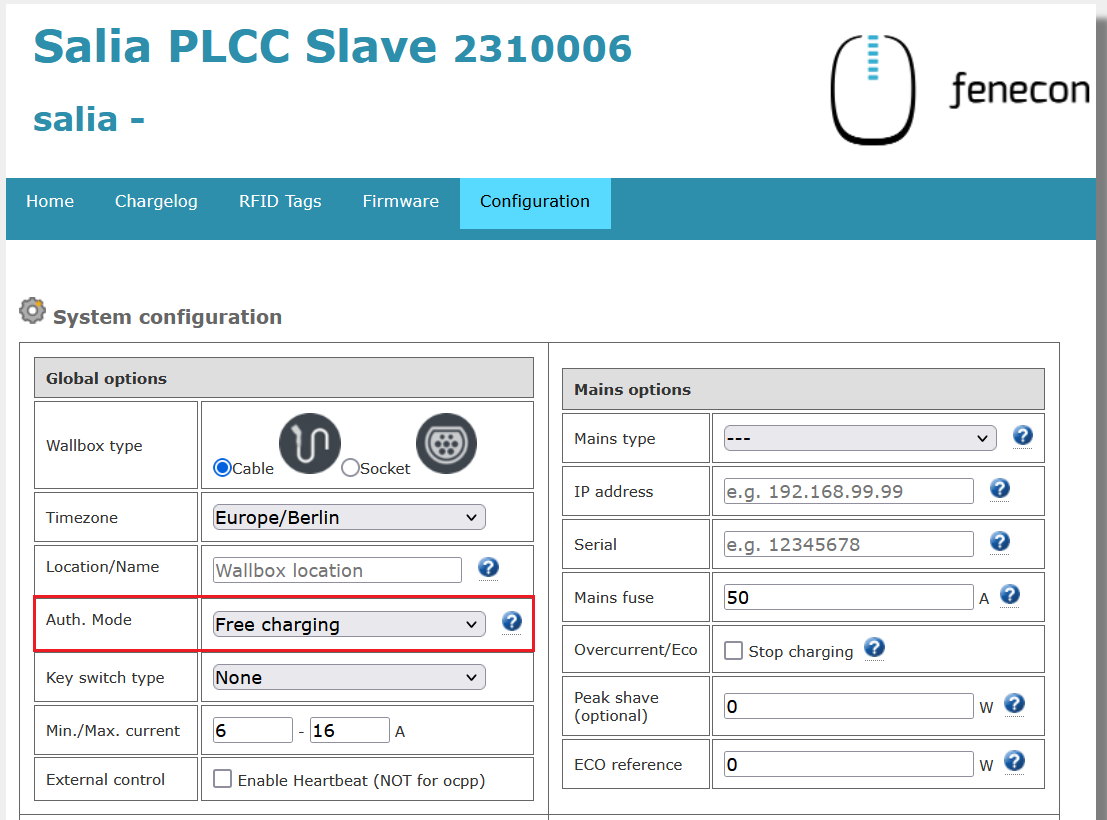
Go to the Configuration tab.
-
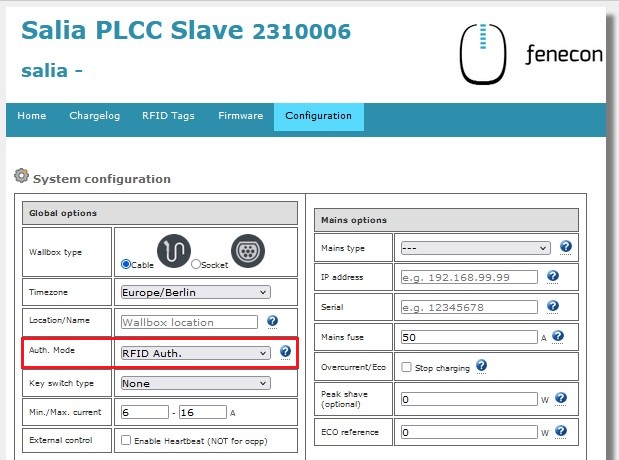
In the Global Options section, set the Authorization Mode from Free Charging to RFID Authorization.
-
To complete the configuration, please click on Save and Reboot.

-
The icon for RFID authorization should now be displayed on the start page of your SALIA web interface.
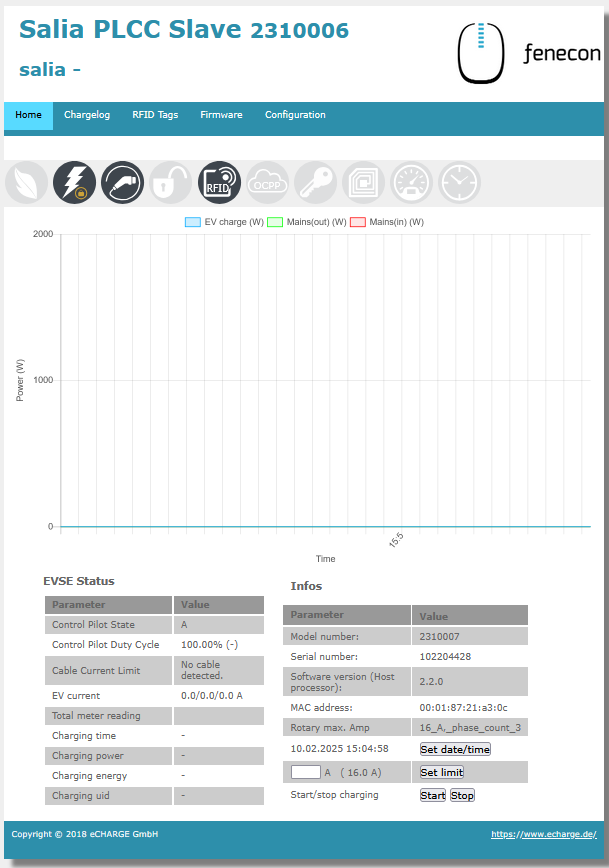
|
Please note that the RFID authorization of your Hardy Barth eCharger cPµ2 Pro can only be changed via the SALIA web interface. |
To deactivate the RFID authorization of your Hardy Barth eCharger cPµ2 Pro, carry out steps 1 to 5.
Important: In step 3 Global Options, set the Authorization Mode from RFID Authorization to Free Charging.
The symbol for RFID authorization should now be greyed out on the start page of your SALIA web interface.
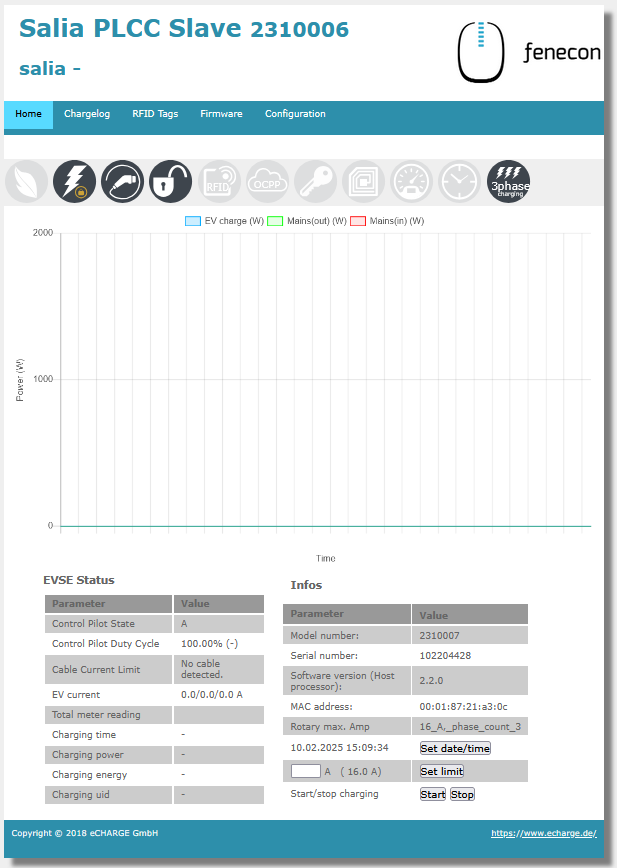
|
Please note that no release is required in Free Charging mode. Therefore, set your Hardy Barth eCharger cPµ2 Pro via the FEMS App AC charging station to OFF for longer absences. |
3.6. Updating the charging station firmware
We recommend always using the latest firmware to ensure that all the latest functions of the charging station can be used.
This can be obtained from the manufacturer’s website of eCharge Hardy Barth or directly via the link below:
Salia eCharge Firmware
The firmware can then be updated via the web interface of the charging station (see Web interface — Charging station).
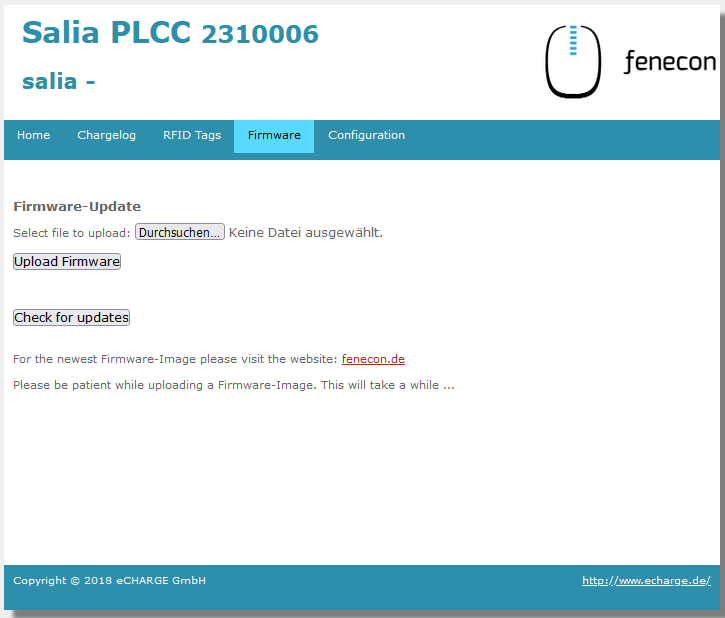
Then proceed as follows:
-
Open the Firmware tab.
-
Select the previously downloaded firmware file with Browse….
-
Click on Upload Firmware.
| The Check for updates function is only available from version 1.50.0 and up. |
The software update has now been completed.
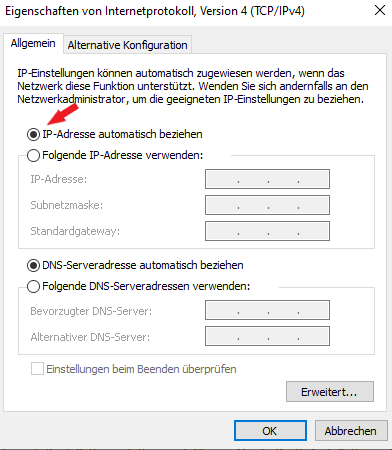
| Remember to remove the static default after completing the configuration. Otherwise, EMS Online Monitoring will not be accessible and connection problems to the internet may occur. |
To do this, reset the setting to "Obtain IP address automatically", as shown below:
| To ensure that all current functions are supported on your EMS, an update must be carried out. Please contact our service team using the contact details below. |
The configuration is now complete.
4. Install Symphon-E App eCharge Hardy Barth cPµ2 Pro Charging Station
In the Symphon-E App Center you will find all installable Symphon-E Apps — such as the Symphon-E App eCharge Hardy Barth cPµ2 Pro Charging Station.
|
In dem Benutzerhandbuch Symphon-E App Center finden Sie eine ausführliche Anleitung zur Bedienung des Symphon-E App Center. Des Weiteren wird beschrieben, wie ein Lizenzschlüssel registriert und eingelöst werden kann. |
Folgen Sie anschließend den Anweisungen des Symphon-E App Installationsassistenten Ihrer Hardy Barth eCharger cPµ2 Pro.
4.1. Installationsassistent
You will then be taken to the installation wizard for Symphon-E App eCharge Hardy Barth cPµ2 Pro Charging Station.

Some of the input fields are pre-filled. Nevertheless, enter your data if it differs from the default values (e. g. IP address). Otherwise, the default values can be retained (e. g. port, Modbus unit ID).
| Mandatory fields are marked with * |
| Check your entries and make sure that they are correct. Otherwise the respective app will not work properly! |
For the Hardy Barth eCharger cPµ2 Pro, please select "1" for the number of charging points.
In the next step, you can set a phase rotation.
|
Please note that phase rotation is only included from FEMS release 2024.11.2 or later. |
The phase connection L1_L2_L3 is selected as standard.

If your phase connection differs from this, you can select a different phase connection using the drop-down button.
|
Sollten Sie von der App-Variante Write Access auf Read Access wechseln, muss Ihre Wallbox neugestartet werden. |

Confirm with "OK".
Then click on "Install app".

Once the installation process is complete, the new app appears in the overview of the Symphon-E App Center in the "Installed" category.
The Symphon-E App eCharge Hardy Barth cPµ2 Pro Charging Station has been successfully installed.
4.2. Edit EMS app
|
Bereits installierte Apps können nachträglich bearbeitet werden, um Konfigurationseinstellungen zu ändern. Wählen Sie hierzu die jeweilige App in der Symphon-E App Center Übersicht aus und klicken Sie auf die Schaltfläche "App bearbeiten". Eine detaillierte Anleitung hierzu finden Sie im Benutzerhandbuch Symphon-E App Center. |